Monday, 9 July 2012
Friday, 29 June 2012
Steel Wool Photography - Tutorial!!
Steel Wool Photography Tutorial!!!

Ever wanted to create an image like this one?
List of equipment you need:
- DSLR
- Tripod
- Cable Release (if you have one)
- A whisk
- Some sort of cable that wont break easily!
- Black Electrical tape (or some other tape that is strong)
- A lighter
- Gloves
- HAT is very important if you have long hair!!
- Trousers/Jeans (Black or Dark)
- Jacket/Hoodie ( Black or Dark)
- Shoes/trainers ( Black or Dark)
- Plenty of Water!! or a fire extinguisher!! <-- encase of emergency!
- Optional :A Friend to spin for you! ( very handy)
- A torch so you can see in the dark!
- And the most important part is Steel Wool!! Make sure you use FINE steel wool! more about this later.
First things first is to set your whisk and cable up!
Attaching the whisk to the cable allows you to spin the steel wool that's in the whisk.
 |
Step 2: Now seal any of the parts of the whisk that may be weak, I.e Around the handle.
Step 3: Once you whisk is sealed take it outside and spin it round as fast as you can and make sure the whisk does not start to break or begin to come away from you cable, if this happens tightly wrap tape around and repeat this step till your whisk is secure!
Now for the Wool!!
Your wool has to be specific type of style wool!!
Steel wool comes in different grades of thinness, the thickness you need for this photography is FINE also known as Grade 0, 00, 000, or 0000. Some say that Grade 0000 burns quicker but it depends on what you find in your results for my work i used Grade 00 Fine Steel wool ( this will burn for around 20-30 seconds.


Adding the steel wool into the whisk
This step is very straight forward
-- Place the Steel wool in the whisk firmly in place

-- Pull the Steel wool apart just a little bit to "fluff it up" This will make it catch a light easier.
-- Spin the whisk around as fast as possible this is to make sure that wool will stay in place while it is burning.
Now your whisk is ready!! Make sure you have some water to hand before you go out and shoot (couple of large bottles of water) or a fire extinguisher this is so that you can put out the steel wool at the end of the shot, or if any of the sparks begin to catch light
 |
| Test Shot |
Best time to shoot is late in the night.
What should my camera settings be ??
Shutter: 25 seconds Aperture: F/8 to 16 ISO/ASA: 100-200
Always take one or two test shots before shooting with the steel wool, just to test exposure (Make sure the image is not over exposed)
 |
| Image of the settings on my Canon 450D |
Now for the fun bit!! the shooting!
Lets get shooting! - Before you shoot make sure you are full covered and you are wearing a hat to protect you hair!! and gloves to protect your hands!
-- Once you have your camera set on a tripod set you camera settings and check your exposure by taking a test shot or two.
-- Use the torch and get a friend to stand where you want them too and manually focus the image.
-- Have your friend ready with the whisk and the lighter and double check your settings are correct.
-- Set the steel wool a light with the lighter and as soon as the steel wool has caught a light spin in a circle as fast as you can straight away!! ( the harder you spin the more the sparks will fly!!) as soon as your friend begins to spin take the shot!!
-- If there are still sparks and you have finished taking the shot, what are you waiting for ? take another as soon as you can!!!!!!
-- When the sparks have finished carefully shake any reaming steel wool out of the whisk and using the water, pour some over the steel wool to put it out ( Careful it smokes a lot)
-- View your images and wait 5 minutes or so to make sure no stray sparks catch a light to anything in the area then proceed with any other shots you want!
Things to be careful about!!
- Stray sparks setting the area a light - make sure you wait around after every shot to make sure everything is out!!
- Make sure it has been raining the night/day before or so.
- ALWAYS ALWAYS! cover up and if you need to shield your eyes with glasses or something
Thank you for reading!!

Have fun with this I know I did!
Big thanks to my friend Omar for doing most of the spinning in the images!!
Just remember be safe and why not video the shot I did: https://www.youtube.com/watch?v=LysSjHcYk4Y&feature=plcp
Sorry about the low quality
Check out my Facebook if you have the time: www.facebook.com/PhotographyKC
Kieran
KC Photography
As always all images have been taken by me! ( KC Photography )
Sunday, 24 June 2012
Double Exposures (Film only)
Photography Technique #1
This post is about Double Exposures with the use of film.
There are many ways to create double exposures, either in the shooting process or in the darkroom.
How do I shoot double exposures ?
They can be easily created depending on your make of film camera.
If your camera is fully manual and made out of metal (this is common in most old style 35mm SLR's) then follow the first set of instructions.
However if your camera is a more modern film camera (that has automatic feature's ) then follow the second set of instructions.
What film to choose ? Image: 3 Fujifilm films two colour (left) one B+W
(right)

Select a film you wish to use, make sure you choose a reasonable ISO. For Example ISO's 100-400 are usually suitable for double exposure photography. For these tutorials we will use ISO 400 as an example ISO. You can use either colour or Black and white film.
Note: ALWAYS read your instruction manual before to find out if your camera manual tells you how to create double exposures.
Fully Manual SLR's
With fully manual cameras you have two ways of taking double exposures. But before you can starting taking your shots you need to increase your ISO by a stop, for example ISO 200 will become ISO 400, or ISO 400 will become ISO 800 this allows you to have two frames evenly exposed in one frame. Also by doubling the ISO this halves how long the film is exposed for.

The best way of shoot double exposures is too shoot a whole roll of film at the higher ISO then eject the film when you have wound it back, but instead of winding all of the film into the canister leave the film leader out so you can then re load the camera with the same film!
WARNING!: Some cheaper films MAY rip on the second set of exposures!
So now that you have shot the roll of film at the higher ISO, KEEP the same ISO setting for the second time and shoot the roll again.

To the right is an example of a double exposure taken with a Canon AE-1 Program, with Kodak film 200.
Top Tip: If you have your own scanner ask the processing labs not to cut the film this allows you the ability to line up the frames your self. with out someone else that could cut them wrong.

More Modern Film SLR's
If you don't have a fully manual SLR but you do have a SLR that has more features, such as automatic winding, or Automatic modes, then there is a good chance that you camera has the ability to take multiple exposures with out having to shoot the film twice.
To the right is an image of a Canon EOS 300
Now depending on your camera the settings will be different so always read your manual for more information.
If your using a Canon EOS 300 then here is how to do double exposures (most canon EOS film SLRs have the same way.)
Step 1: load your film
Step 2: Now double your ISO. for example: From ISO 200 to 400, or from ISO 100 to 200. (refer to your manual on how to do this)
.jpg)
Step 3: on the canon EOS 300 there is a FUNC. button (function) press this till the arrow is pointing at
this symbol:

.jpg) Step 4: using the dial ( that you use to change your settings such as shutter and aperture settings) and set it too 2, you can go up-to 9 but try two to begin with and feel free to experiment.) this stops the film from advancing to the next frame and will re set when you have took your two shots.
Step 4: using the dial ( that you use to change your settings such as shutter and aperture settings) and set it too 2, you can go up-to 9 but try two to begin with and feel free to experiment.) this stops the film from advancing to the next frame and will re set when you have took your two shots.Step 5: Set your camera to Manual, Shutter/Aperture priority or Program. Take your two shots.
 Step 6: Always remember this! when you adjust your ISO adjust it back when you have finished! and if you want your next shoot to be a double exposure remember to set the double exposure setting again.
To the right is an example of a double exposure taken with the Canon EOS 300 with Fujifilm ISO 400 film.
I hope this quick tutorial helped!!
This is just one of a series of tutorials I plan to do such as:
- Photoshop Tutorials
- Lightroom Tutorials
- Photography Techniques
and more!
IF you liked this blog post please like my Facebook: www.facebook.com/PhotographyKC
All images were taken by me!
If you have any questions Tweet me at: @Kieran28051993
Leave a comment! and share with your friends
thank you for reading
Kieran
KC Photography
Tuesday, 29 May 2012
#1 Photography Handbook
Ok so now im coming to the end of my college life! I will have more time to blog! :D
But my final project is done at last! 3 months of work and its complete!

But my final project is done at last! 3 months of work and its complete!

88 pages full of tutorials and lots of ideas to try out!! im so happy with it so i will be posting one or two tutorials a week from the handbook :)
Monday, 14 May 2012
F Monday everyone!
Its a tad late for F Monday but never the less here it is!
So this Mondays featured Flickr group is: HDR http://www.flickr.com/groups/hdr/
This Group is all about HDR.
HDR stands for High Dynamic Range. I will be doing a tutorial about HDR in the next week or so.
I really love some of the shots in this group such as these two shots I liked in the pool.
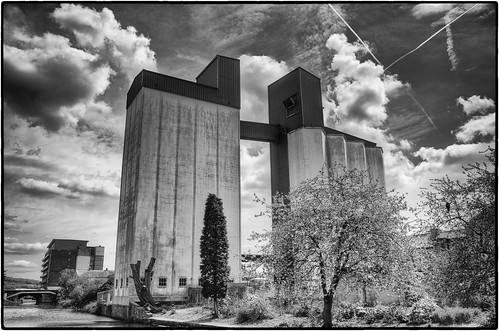
I love the detail in this image, the sky is very impacting and very contrasty, also the detail in the building is very nice
Shot 2: 
All credit for this iamge goes too: http://www.flickr.com/photos/ingo72/
I love it when people HDR buildings because you get all the fine details in the image such as the brick work and even the dirt on the ground, this image has to be one of my favourite HDR images that I have seen so far, I love the colour and the perspective of the stairs.
As always no copyright intended, and all images used on the F Monday post is copyrighted to the original owners.
Please check out there photostream's! and the Group and join the group if you love HDR photography.
Please look out in the next couple of weeks on a post about HDR photography.
That's it for this Monday! see you all tomorrow :)
The KCP
Saturday, 12 May 2012
Let's have a catch up!
Time To catch up and get sorted! apologises for not posting much this week I will be back on track soon :)
I've combined Thursdays film day and F Fridays together for this week
Here we go! So this weeks Flickr Group is: "Cross Processing - Film Only"
I really love this group as Cross Processing i feel is amazing but when you do it film it takes a whole new level!
The colours of a cross processed image will very but for the most part they are very green cast or a very blue cast .
Traditional Cross Processing is done by processing film in the wrong colour chemicals. Results can very from film to film. Most companies will cross process you film for free or for an extra pound or so. One british company that still does this is DSCL colour labs : http://www.dscolourlabs.co.uk/

Photos From the pool
So here is are two of the photos i liked from the pool
First: Is this shot from: http://www.flickr.com/photos/julius68/
I really love the colours in this image with the warm and cool tones

Second: This shot is from: http://www.flickr.com/photos/37461467@N00/
I love the difference in contrast compared to the previous one, this image has really cool tones in the background. Also if I was to compare the two I love the difference of nature and man made.
I feel these two images are really good but there are just as good ones in the pool!
All images are copyrighted to their owners
No copyright intended
Facebook time!
This weeks Facebook like page is: "I Still Shoot Film"
I love this like page SOOOOO many film photographs with all different films and techniques. so check it out if you love film even maybe a like ?
As always Thanks for reading!
If you love film and love this kind of effect, it is really worth looking into. Also if you can't shoot film but still want to get a similar effect there are tutorials out there to create the effect I may do my own video tutorial on it. Also check out my Facebook page if you have a spare minute: www.facebook.com/PhotographyKC
Thanks again for reading!
The KCP
P.S. Sorry it was a late post I am currently getting a better ideas for content so over the next few weeks may not be the same! BUT! F Fridays will be staying!
Friday, 11 May 2012
F Fridays
It's F Friday everyone!
But before i can post F Fridays post I have too attend a private viewing at an Exhibition with my work in, so I will post when I return home and also because I didn't post last night due to setting up the exhibition I will post a second post tonight all to do with Film Thursdays :) So I will see you all later! :D
The KCP
Wednesday, 9 May 2012
A Change Of Plan
OK so its Wednesday...
Wednesdays are supposed to be Idea and Concepts HOWEVER for the lack of ideas that I can come up with at the moment!! Wednesdays are going to be YouTube Wednesdays! Where i will be posting great photography related YouTubers! with either great ideas and techniques for you to try or some editing tutorials!
Also I would like to apologize for no photographic technique yesterday but there will be one next week!
Ok so this weeks YouTuber is!!
He is a Photoshop/Adobe Expert!!
He has some great detailed but quick tutorials!
I particular like this tutorial because it doesn't last for too long and if very informative. If this isn't your thing for Photoshop then browse through his videos and you may find something that may interest you. Well that's it for this Wednesday!
Thanks for Reading
The KCP
Tuesday, 8 May 2012
Sorry too all KCP readers
sorry everyone!
Due to some heavy studying and nearly coming to the end of my college course I am having to focus for the next week or so!! BUT while I have some spare time I am making some things for the KCP so big things to come soon! So no technique today im afraid but will post for the rest of the week!
See you all tomorrow!
The KCP
Monday, 7 May 2012
Flickr Mondays
Welcome to Flickr Mondays!
Ok guys and gals its Flickr Monday and this weeks Flickr group is "The Portrait Group" http://www.flickr.com/groups/theportraitgroup/
I really like this group as its good to get ideas from and inspiration for your own portraits!
Photos from the pool
 All credit for this image goes too: http://www.flickr.com/photos/samhaddixphotography/page2/
I also check this Flickr photostream and i love the work!! very detailed images and great images all round!!
for the next image from the pool i picked
 All credit for this image goes to: http://www.flickr.com/photos/46208023@N06/page7/
I also had a look at this stream and i loved the range that was in the stream, and some of the editing i feel was really well done!
Well that's it for this Monday! Hope you enjoyed this Mondays post! make sure you join the group! even if you don't shoot portraits you could still be inspired!
Well thanks for reading :)
The KCP
No copyright intended, all images are protected by copyright.
Ok guys and gals its Flickr Monday and this weeks Flickr group is "The Portrait Group" http://www.flickr.com/groups/theportraitgroup/
I really like this group as its good to get ideas from and inspiration for your own portraits!
Photos from the pool
All credit for this image goes too: http://www.flickr.com/photos/samhaddixphotography/page2/I also check this Flickr photostream and i love the work!! very detailed images and great images all round!!
for the next image from the pool i picked
All credit for this image goes to: http://www.flickr.com/photos/46208023@N06/page7/I also had a look at this stream and i loved the range that was in the stream, and some of the editing i feel was really well done!
Well that's it for this Monday! Hope you enjoyed this Mondays post! make sure you join the group! even if you don't shoot portraits you could still be inspired!
Well thanks for reading :)
The KCP
No copyright intended, all images are protected by copyright.
Sunday, 6 May 2012
#YouTube
Would like to welcome my good friend Cory to the KCP! he is going to be my head of editing, and he will be editing my videos for this blog and my YouTube channel, so great things to be expected! His Twitter!
@csteppings :D check him out
#Idea!
Got some great ideas on how i can make this blog better to look at by making videos!! :D so its almost like a blog/vblog. but there won't be a video everyday, but its just because I'm not one for writing or typing and more for doing so making videos will make things a lot easier for me :) and a lot easier for you (the readers/viewers) to understand me, as i feel i'l be able to get the message across a lot easier :) but for now i will stick to the written side of the blog! Flick Monday tomorrow so get ready for that! :D
The KCP
The KCP
Friday, 4 May 2012
It's F Friday!!!!!!
Ok sorry about it being a bit late! but here is F Fridays post!
Flickr: This Flickr group is all about London! anything and everything to do with london! i have uploaded images to this group and so have many others! i love some of the work that is on there so it is something worth checking out! Also the limit is great at a 50 a day!! but you don't have to add 50 a day! that would be insane. So if you love shooting in London or have some London shots on your Flickr join the group and add to the pool :)
 this was one of the shots i uploaded to the London group check out the rest of my stream here: http://www.flickr.com/photos/photographykc/
Facebook: This is a Photographer that is based in Tokyo and i love his portraits and his studio work! certainly a page to like and view his work! http://www.facebook.com/streetportraitist AND! he still shots film!! HOW COOL! :D
So that's this Fridays post :) hope you like the group and this weeks facebook photographer! Have a great weekend! and will post on Monday!
The KCP
The KCP
F Fridays!!
It's F Friday!! Flick/Facebook day, lets look for some photography groups and like pages !! will post this Fridays choices by 6 Pm tonight!
The KCP
The KCP
Thursday, 3 May 2012
Film
Film what's that ?
Film is slowly becoming less and less available because of the digital age, but many people do still shot the odd roll or two of film and many of them still shot film only!
However saying all this film can still be purchased online or in some shops such as Boots in the UK or Jessops in the UK, and these price anything between £2-£10 a roll.
Colour and black and white film are still available and so is infrared film (if your not sure what infrared film is either Google it or I will post it in a week or so on a Tuesday.
I personally love shooting film, weather it's colour or black and white, but its so expensive to get them developed and printed *SIGH*
but after browsing around I found that you are in your right to just ask for processing and this should cost about half of what it would be with prints (£2 at Asda in the UK), and you can either buy a film scanner or as them to put it on disc for around a pound!! How cool is that! this saves money and time!
So what's going to be posted on Thursdays ??
Well links to great places to get film supplies, links to photographers that still use film, and film of the week. Also links for those who upload film shots to Flickr and want to find groups to upload too
Well that's it for today, I will be including images and all sorts to my posts but for now just text!
The KCP
Oh and please check my Facebook like page www.facebook.com/PhotographyKC
Thanks for Reading
What's to come?
OK so decided what I'm going to be doing on a daily bases on the KCP
Mondays: Mondays will be Flickr Mondays where i find an interesting group on Flickr to have a look at, and pick a couple of my favourite images from that pool.
Tuesdays: Tuesdays will be 1 Photographic techniques or style, etc..
Wednesday: Wednesdays will be Ideas and Concepts for you to try out (2-3 a week)
Thursdays: Thursday is all about film! (not movies, old school photography film!) and each Thursday will have a post with something new in!
Fridays: Flickr/Facebook Fridays
Saturday & Sunday - Break for Monday!!
Going to start posting tonight!!
Wednesday, 2 May 2012
Welcome to the KCP
Welcome to the KCP, a place where we blog tips and tricks in the world of photography, ideas, mind maps, diagrams, techniques with descriptions on how to do these things, also with links to videos or other blogs with useful information. Perfect for someone starting in photography or someone with experience and wants to learn something new! so keep an eye or for new post 2-3 times a week
Subscribe to:
Posts (Atom)