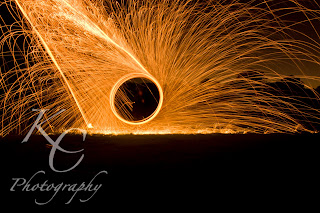
Steel Wool Photography Tutorial!!!

Ever wanted to create an image like this one?
List of equipment you need:
- DSLR
- Tripod
- Cable Release (if you have one)
- A whisk
- Some sort of cable that wont break easily!
- Black Electrical tape (or some other tape that is strong)
- A lighter
- Gloves
- HAT is very important if you have long hair!!
- Trousers/Jeans (Black or Dark)
- Jacket/Hoodie ( Black or Dark)
- Shoes/trainers ( Black or Dark)
- Plenty of Water!! or a fire extinguisher!! <-- encase of emergency!
- Optional :A Friend to spin for you! ( very handy)
- A torch so you can see in the dark!
- And the most important part is Steel Wool!! Make sure you use FINE steel wool! more about this later.
First things first is to set your whisk and cable up!
Attaching the whisk to the cable allows you to spin the steel wool that's in the whisk.
 |
Step 2: Now seal any of the parts of the whisk that may be weak, I.e Around the handle.
Step 3: Once you whisk is sealed take it outside and spin it round as fast as you can and make sure the whisk does not start to break or begin to come away from you cable, if this happens tightly wrap tape around and repeat this step till your whisk is secure!
Now for the Wool!!
Your wool has to be specific type of style wool!!
Steel wool comes in different grades of thinness, the thickness you need for this photography is FINE also known as Grade 0, 00, 000, or 0000. Some say that Grade 0000 burns quicker but it depends on what you find in your results for my work i used Grade 00 Fine Steel wool ( this will burn for around 20-30 seconds.
Adding the steel wool into the whisk
This step is very straight forward
-- Place the Steel wool in the whisk firmly in place
-- Pull the Steel wool apart just a little bit to "fluff it up" This will make it catch a light easier.
-- Spin the whisk around as fast as possible this is to make sure that wool will stay in place while it is burning.
Now your whisk is ready!! Make sure you have some water to hand before you go out and shoot (couple of large bottles of water) or a fire extinguisher this is so that you can put out the steel wool at the end of the shot, or if any of the sparks begin to catch light
 |
| Test Shot |
Best time to shoot is late in the night.
What should my camera settings be ??
Shutter: 25 seconds Aperture: F/8 to 16 ISO/ASA: 100-200
Always take one or two test shots before shooting with the steel wool, just to test exposure (Make sure the image is not over exposed)
 |
| Image of the settings on my Canon 450D |
Now for the fun bit!! the shooting!
Lets get shooting! - Before you shoot make sure you are full covered and you are wearing a hat to protect you hair!! and gloves to protect your hands!
-- Once you have your camera set on a tripod set you camera settings and check your exposure by taking a test shot or two.
-- Use the torch and get a friend to stand where you want them too and manually focus the image.
-- Have your friend ready with the whisk and the lighter and double check your settings are correct.
-- Set the steel wool a light with the lighter and as soon as the steel wool has caught a light spin in a circle as fast as you can straight away!! ( the harder you spin the more the sparks will fly!!) as soon as your friend begins to spin take the shot!!
-- If there are still sparks and you have finished taking the shot, what are you waiting for ? take another as soon as you can!!!!!!
-- When the sparks have finished carefully shake any reaming steel wool out of the whisk and using the water, pour some over the steel wool to put it out ( Careful it smokes a lot)
-- View your images and wait 5 minutes or so to make sure no stray sparks catch a light to anything in the area then proceed with any other shots you want!
Things to be careful about!!
- Stray sparks setting the area a light - make sure you wait around after every shot to make sure everything is out!!
- Make sure it has been raining the night/day before or so.
- ALWAYS ALWAYS! cover up and if you need to shield your eyes with glasses or something
Thank you for reading!!
Have fun with this I know I did!
Big thanks to my friend Omar for doing most of the spinning in the images!!
Just remember be safe and why not video the shot I did: https://www.youtube.com/watch?v=LysSjHcYk4Y&feature=plcp
Sorry about the low quality
Check out my Facebook if you have the time: www.facebook.com/PhotographyKC
Kieran
KC Photography
As always all images have been taken by me! ( KC Photography )


No comments:
Post a Comment